Bitstamp is one of the top exchanges where you can buy and sell cryptocurrencies. Our tutorial will show you the steps required to trade on this exchange.
About Bitstamp
 Launched in 2011, Bitstamp is a popular crypto exchange which has a predominantly European user base.
The exchange was first based in Slovenia, but then it relocated in 2016 to Luxembourg to receive licensing from the Commission de Surveillance du Secteur Financier.
Bitstamp is also one of the few exchanges that support credit card purchases, as well as direct fiat purchases with Euro and USD. However, when it comes to its crypto selection, Bitstamp is rather limited, supporting only five cryptos. But if you only want to buy and sell cryptocurrencies, such as Bitcoin (BTC), Bitcoin Cash (BCH), Litecoin (LTC), Ethereum (ETH), and Ripple (XRP), then this exchange might suit your needs.
Let’s go over the steps required to effectuate a trade on Bitstamp.
First Step: Creating an Account
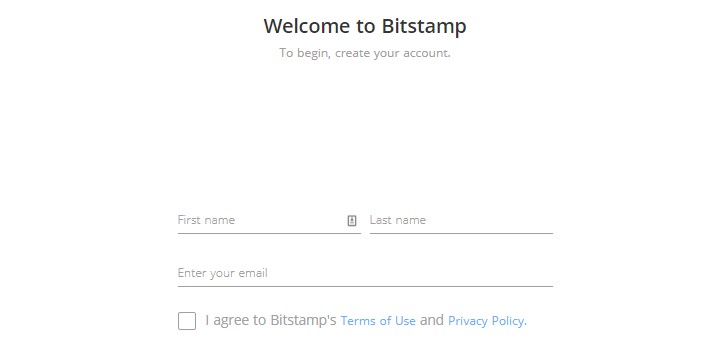
First, you will have to sign up and create an account on the platform.
- Go to Bitstamp.net;
- Select “Register” from the top right of the page;
- Fill in the form with your name and email address;
- Agree to Bitstamp’s terms and conditions;
- Click “Register;”
- You will receive your user ID and password via email;
- Go to the exchange and log in with the username and password details you received.

Second Step: Start Verification
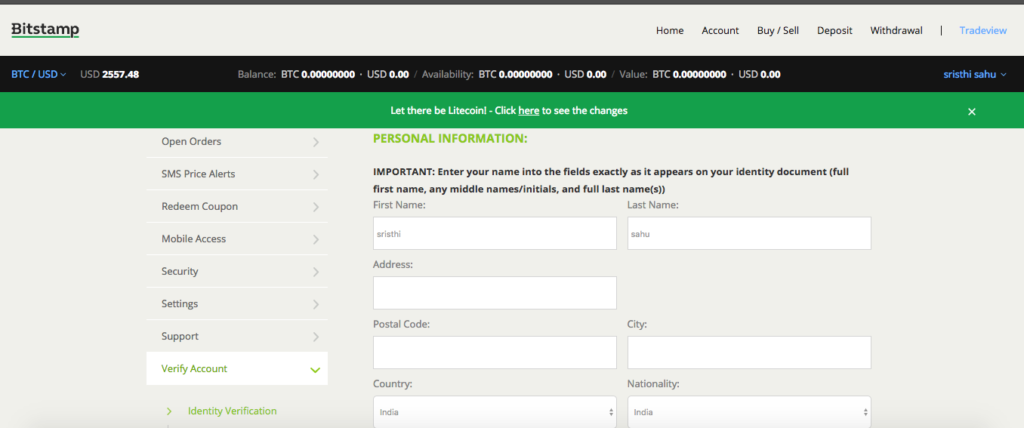
Bitstamp requires its users to provide personal information for identity verification purposes. As it handles fiat transactions, you will have to offer extensive information compared to other exchanges where you only need a name and email address to sign up for an account.
- Start the verification process by accessing https://www.bitstamp.net/account/verify;
- You will be required to select if you want a corporate or personal account;
- You will then be required to enter your name and residential address. Write your name as it is written on your ID;
- Scroll down and enter your date of birth;
- Declare whether you’re a US citizen or resident;
- Upload an image of your ID by scrolling down and clicking the “Browse” button;
- Enter the ID’s issue and expiration date;
- Click the “Browse” button to upload proof of residence; (you can upload a bank statement, a utility bill, or a tax certificate. ID do not apply.)
- Click “Submit Verification Request.”
 coinpedia.org
Verification can take up to two or three working days. You can check your verification status by accessing https://www.bitstamp.net/account/verify.
Third Step: Enable 2FA
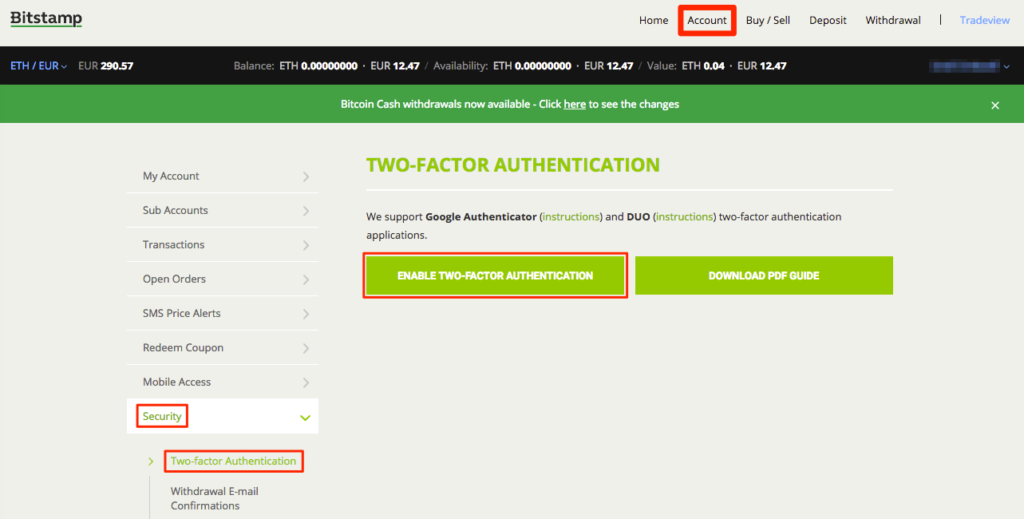
Before you buy and sell cryptocurrencies, take the extra security step of enabling your account’s 2-factor authentication (2-FA) feature.
- Go to the main account dashboard and click on “Security” from the left side of the page;
- You will be required to have Google Authenticator installed;
- Google Authenticator will then feature a six-digit code when you link it to your Bitstamp account;
- Enter this code to enable 2FA.
Now every time you log in, you will have to enter this six-digit code.
 solidum.capital
Fourth Step: Deposit Funds
You can fund your Bitstamp account with fiat or crypto, either through credit card or bank transfers.
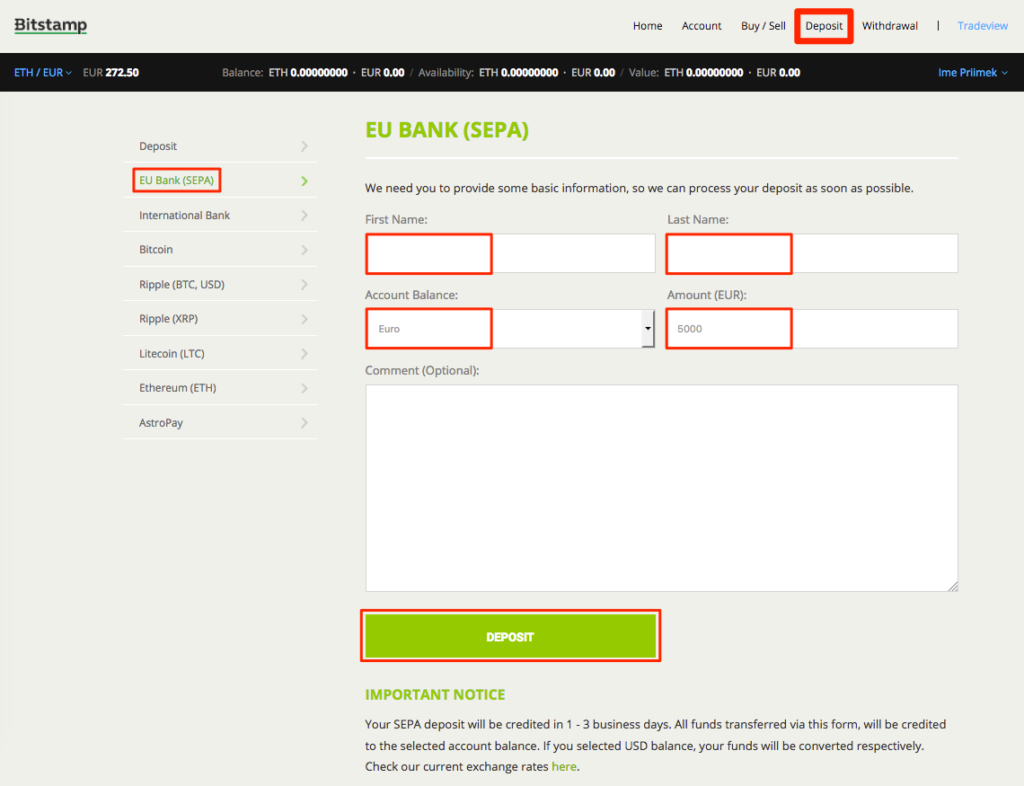
- Click the “Deposit” tab;
- Select “Credit Card” in the left sidebar.
Note: depositing funds or purchasing crypto via credit card is the fastest option, but it also comes with the highest fees.
- When you want to deposit with one of the supported cryptocurrencies, you will be presented with your deposit address and its respective QR code;
- For deposit via bank transfers, click on “EU Bank (SEPA)” on the left or select “International Bank” if you are not from the EU region;
- Check that your first and last name are correct;
- Under “Account Balance” select either EUR or USD;
- Under “Amount” enter how much you want to deposit;
- Click the “Deposit” button when finished.
 solidum.capital
Bitstamp will feature the necessary account details and transaction reference number. This information has to be included when sending funds.
Buy and Sell Cryptocurrencies on Bitstamp
Using the basic trading interface
Click the “Buy/Sell” tab on the top menu. You will be redirected to the trading interfaces.
Bitstamp features five types of trading orders that you can place:
Instant order – an instant order places a trade at the current bid or ask price, and liquidity is insufficient at that time to satisfy the order, Bitstamp’s trading engine will relocate the order immediately to the current order book.
- Click on the crypto you want to buy;
- Fill in the “I want to spend” box how much you want to spend on your purchase. This amount is calculated to include Bitstamp’s fees;
- Click on the “Buy” button underneath to place your order;
- After the order is processed, the coins will be added to your balance.
Limit order – the standard limit order is when a user establishes the price and amount of the cryptocurrency he wants to buy or sell. Thus, the purchase will only be executed when your crypto reaches the price you set in the order.
- Click “Limit Order (Advanced)” to place a limit order;
- Under “Amount to Buy” enter the number of cryptos you want;
- Under “Buy Price” enter the price you wish to pay per coin;
- Click the “Buy” button to finish your order.
Market order – this order effectuates the trade at the current market price.
Stop order – the stop order executes the trade at the user’s set price when the market price reaches that certain level. The user enters the price he wants the trade to start at, as well as the price he wants to buy or sell the cryptocurrency.
- Select “Stop Order (Advanced)” on the left;
- Enter the amount you want to buy or sell cryptocurrencies when the coin drops or rises to a certain value to place a “Stop Sell” or “Stop Buy” order;
- Set this value in “If price falls to.”
Credit card
- Go to the deposit page;
- Select the credit card from the side menu;
- Select which cryptocurrency you want to buy;
- Select with which currency (USD or EUR) you want to pay with;
- Enter the amount of your purchase;
- Enter your credit card details;
- Click “submit.”
Buy and sell cryptocurrencies using the advanced interface
If you are a more experienced trader, you can switch to the advanced tradeview interface, which has more advanced analysis and tracking features that might aid you in your trading decisions. Click on the “Tradeview” tab in the upper right corner of the page to access it.

Withdrawing your crypto
We recommend that you move your coins from any exchange as soon as you finish trading for security reasons. To withdraw your coins, follow the steps below:
- Click the “Withdraw” tab;
- Select how you would like to withdraw your coins. Bitstamp supports withdrawing to an external digital wallet and EU or international bank;
- Enter and confirm your banking information if you withdraw via an EU or international bank, or provide your external wallet address;
- Enter the amount you want to withdraw;
- Select “2FA 7 Withdraw;”
- Enter your 2FA code;
- Click “Confirm.”
Conclusion
With this, we conclude our tutorial on how to buy and sell cryptocurrencies on Bitstamp. We hope the information we provided has been of help to you.

coindoo.com is author of this content, TheBitcoinNews.com is is not responsible for the content of external sites.
Our Social Networks: Facebook Instagram Pinterest Reddit Telegram Twitter Youtube


